
Tuesday, December 5, 2017
Schematic/Block Diagram for the Sabre
I also decided to visually document all of the physical connections for the components that are onboard the Sabre. The only level of detail that I left out is that it does not show the use of servo extensions.


Monday, December 4, 2017
1.3 GHz Ground Station Schematic
In order to keep my head straight for when I start cutting wires and soldering this new gear together, I find it necessary to plan in a high level of detail. It's not very complicated at all, but when my work bench has 5 components that all need to get connected together properly, it quickly gets overwhelming. Once I have everything, I'll need to figure out the physical layout to determine wire lengths. This part may be tricky because I don't want the Dragon Link transmitting antenna to interfere with either of the video signals, or the 2.4 GHz receiver. It may be trial and error to get enough spacing between components.
I'll post an update once I've built the setup, but I attached a screen capture of my schematic. It is fully comprehensive, including the relevant connector types, and male/female designations.

I'll post an update once I've built the setup, but I attached a screen capture of my schematic. It is fully comprehensive, including the relevant connector types, and male/female designations.

Sunday, December 3, 2017
Microphone in the Sabre
I did a bit of soldering today and got the microphone set up in the Sabre. It required another set of wires to be plugged in to the Vector flight controller. It also required soldering to the audio input wire of the video transmitters. I added the plug to both the 5.8 GHz and 1.3 GHz video transmitters so I can use audio either way. I tested it out and after turning the volume gain way down to get rid of feedback, it works great. It may need some tweaking after test flying to get the volume control set to a good value, but audio definitely comes through clearly on the Headplay.
The whole point is to be able to hear the motor so if I am ever far from home and something doesn't seem like it's behaving right, I can just turn the volume up on the Headplay to make sure the motor is responding properly.
The whole point is to be able to hear the motor so if I am ever far from home and something doesn't seem like it's behaving right, I can just turn the volume up on the Headplay to make sure the motor is responding properly.
 |
| Here's some of the new wiring that went in the Sabre. The microphone is the tiny green circuit board. |
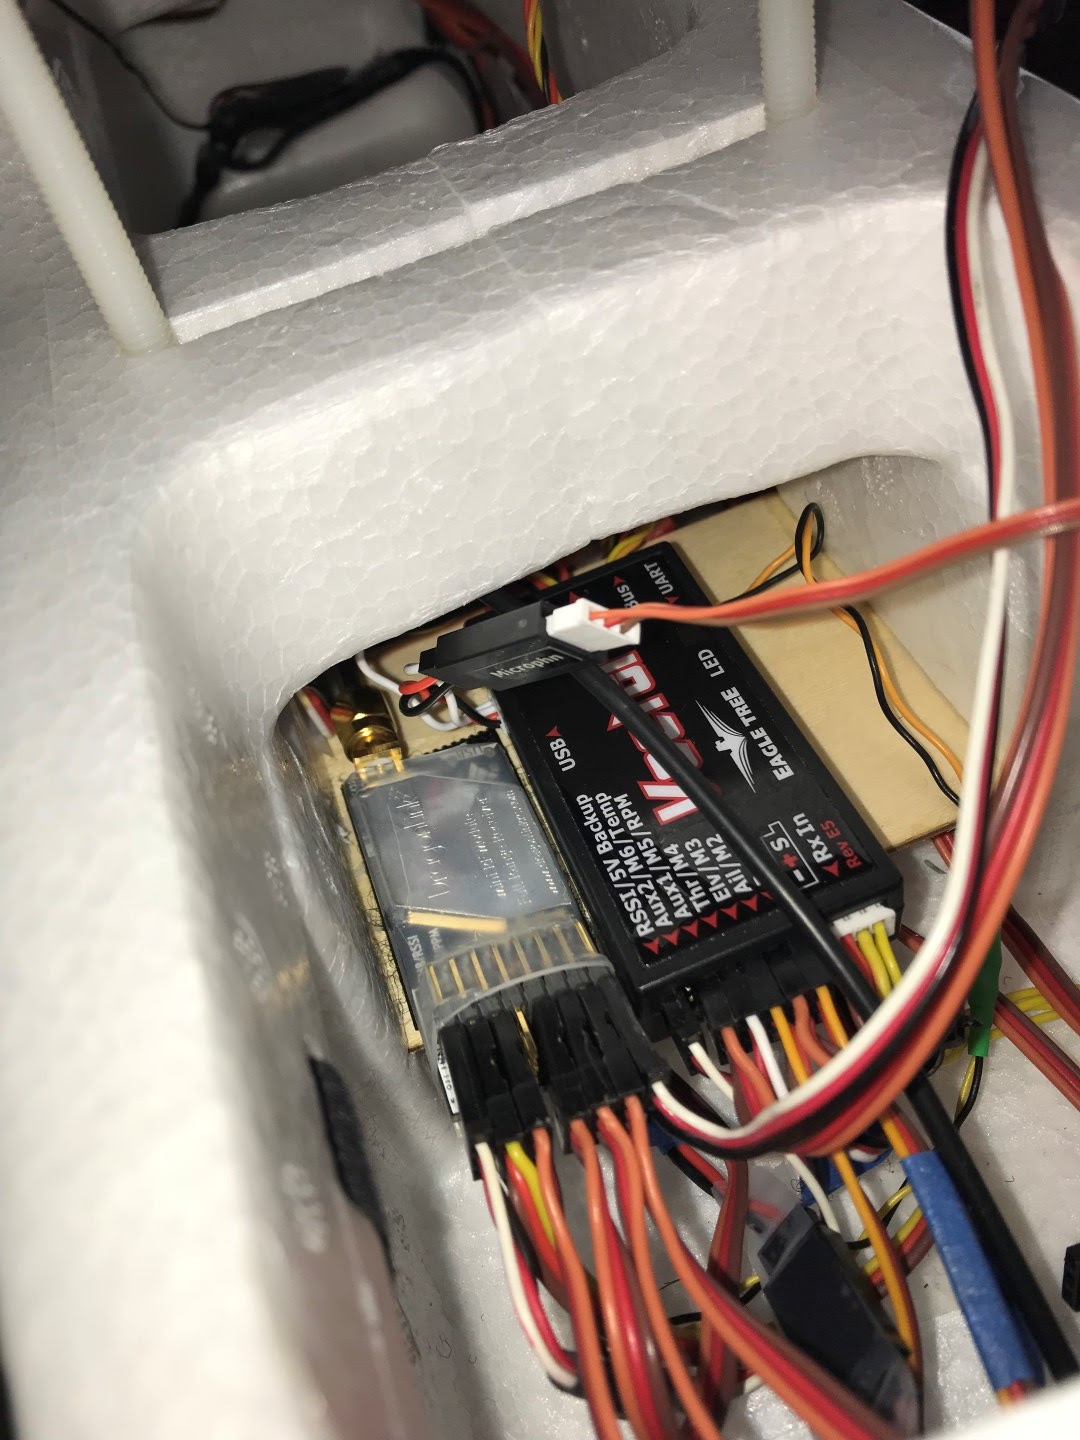 |
| Audio cable is plugged in to the Vector, right next to the Dragon Link receiver. |
 |
| This is the battery compartment of the Sabre. Now after the wing goes on, the microphone will have to be plugged in the the "AUD" wire, just like the video transmitter has always been plugged in to its own wire that goes to the Vector. |
 |
| Here's where I currently have the microphone mounted. It's in the aft portion of the payload bay where the other mass of wiring is. I taped it up so it's out of the way, and won't wiggle during flight. |
Saturday, December 2, 2017
Vortex 230 Mojo
I've been somewhat interested in the modern "race drones" (multirotors or quad copters is all I will call them from now on, because drone is incorrect, and has a negative connotation thanks to the media).
Anyway, since becoming more and more involved with FPV, I decided to try the newest member of ImmersionRC's Vortex lineup, the Vortex 230 Mojo. These race style quad copters are designed to be flown FPV. It comes with everything already installed, including the flight controller, camera, and video transmitter. It will be significantly more convenient to fly than the Sabre, since it is small and portable, and will be able to be flown in smaller places. In general, quads like this are sort of the opposite experience compared to long range FPV. That is, it's high energy and short duration flights, low to the ground.
It came complete as a Bind-N-Fly (directly compatible with my DX20), and ready to fly with modern electronics. I received it in the mail today, and was able to get it set up and did two flights. I'm happy to say it flies amazing. I was pretty intimidated at first but it is truly easy to fly, even in Acro (non-self leveling) mode. My experience with collective pitch helicopters is beneficial, as the controls are similar. I did a few flips in the second flight. The most amazing thing overall is just how much power it has. A split second jab to full throttle pulls over 100 amps and brings it up to 100 feet or so nearly instantly. I'm currently using China Hobby Line 1300mAh, 4S, 100C batteries. Pictures and links to (boring) videos follow. While I did have the Headplay powered on for the fights, I have not flown the quad FPV yet. I just used it to record on the DVR.
First Flight Ground Video
First Flight DVR
Second Flight DVR


Anyway, since becoming more and more involved with FPV, I decided to try the newest member of ImmersionRC's Vortex lineup, the Vortex 230 Mojo. These race style quad copters are designed to be flown FPV. It comes with everything already installed, including the flight controller, camera, and video transmitter. It will be significantly more convenient to fly than the Sabre, since it is small and portable, and will be able to be flown in smaller places. In general, quads like this are sort of the opposite experience compared to long range FPV. That is, it's high energy and short duration flights, low to the ground.
It came complete as a Bind-N-Fly (directly compatible with my DX20), and ready to fly with modern electronics. I received it in the mail today, and was able to get it set up and did two flights. I'm happy to say it flies amazing. I was pretty intimidated at first but it is truly easy to fly, even in Acro (non-self leveling) mode. My experience with collective pitch helicopters is beneficial, as the controls are similar. I did a few flips in the second flight. The most amazing thing overall is just how much power it has. A split second jab to full throttle pulls over 100 amps and brings it up to 100 feet or so nearly instantly. I'm currently using China Hobby Line 1300mAh, 4S, 100C batteries. Pictures and links to (boring) videos follow. While I did have the Headplay powered on for the fights, I have not flown the quad FPV yet. I just used it to record on the DVR.
First Flight Ground Video
First Flight DVR
Second Flight DVR


1.3 GHz FPV Gear, Microphone
My intent with my long range FPV setup has always been to eventually switch from 5.8 GHz to 1.3 GHz video frequency. This is due to better long range ability, due to the lower frequency. This is the go-to frequency band for long range FPV pilots. I took advantage of some Black Friday online sales and started getting the equipment to do this.
I have a now have 400 mW 1.3 GHz video transmitter, a 1.3 GHz video receiver, as well as a 5.8 GHz repeater (to allow me to use my Headplay's built-in 5.8 GHz video receiver wirelessly). I also have a Crosshair antenna for use at the ground station, which I will need to do some serious modifications to, since the equipment is bigger and heavier compared to the 5.8 GHz gear.
The ground station will likely consist of a tripod to mount everything to. This will allow for convenient adjustments to the directional antenna, as well as having an elevated, and consolidated place for all the support equipment.
433 MHz / 1.3 GHz Notch Filter
This filter is recommended for use at the Dragon Link transmitter. It goes between the transmitter and the transmitter antenna, and is supposed to filter out the frequencies in the range that can affect the video signal.
Microphone
I decided to try to get audio working on my setup. The Headplay SE supports audio so I figured why not experiment with it. The microphone was inexpensive and should be very straightforward to wire in to the Vector and video transmitter. (12/3/17: Updated here.)
I'll post more progress as progress is made.
I have a now have 400 mW 1.3 GHz video transmitter, a 1.3 GHz video receiver, as well as a 5.8 GHz repeater (to allow me to use my Headplay's built-in 5.8 GHz video receiver wirelessly). I also have a Crosshair antenna for use at the ground station, which I will need to do some serious modifications to, since the equipment is bigger and heavier compared to the 5.8 GHz gear.
The ground station will likely consist of a tripod to mount everything to. This will allow for convenient adjustments to the directional antenna, as well as having an elevated, and consolidated place for all the support equipment.
 |
| 1.3 GHz Video Transmitter (New is Green) |
 |
| My Bench Test Setup |
I don't have all this stuff set up yet, but made some progress. I rigged up the equipment on the bench successfully and it all works just fine. The picture above shows the test bench setup. The video transmitter (green) is rigged up to a battery an FPV camera. The video receiver (silver) is rigged up to power, and to the video input on the repeater. The repeater (smaller and green) is rigged up to the video output from the 1.3 GHz receiver.
433 MHz / 1.3 GHz Notch Filter
This filter is recommended for use at the Dragon Link transmitter. It goes between the transmitter and the transmitter antenna, and is supposed to filter out the frequencies in the range that can affect the video signal.
 |
| Ground Station Repeater with The Filter Installed |
Microphone
I decided to try to get audio working on my setup. The Headplay SE supports audio so I figured why not experiment with it. The microphone was inexpensive and should be very straightforward to wire in to the Vector and video transmitter. (12/3/17: Updated here.)
I'll post more progress as progress is made.
Wednesday, November 15, 2017
New Batteries for the Ground Station
I recently picked up two new batteries to power ground equipment with my FPV setup.
First, I got a 2s 2200 mAh battery for the Headplay headset. This will power both the headset itself, and the head tracker module. I have 3s batteries that will work for this, but 2s will make the voltage regulators in the components last longer, because they won't have to work as hard.
I also bought 2s 5000 mAh battery. This will be used to power the "ground station." I set up the wiring so that I plug in the Deans to the BEC, and the Dragon Link transmitter and the OrangeRx receiver will always get clean, stable voltage from the dual output BEC. The 5000 mAh battery should be able to power this setup for hours more than I currently would ever need in a single session.
First, I got a 2s 2200 mAh battery for the Headplay headset. This will power both the headset itself, and the head tracker module. I have 3s batteries that will work for this, but 2s will make the voltage regulators in the components last longer, because they won't have to work as hard.
 |
| Battery for Headplay |
I also bought 2s 5000 mAh battery. This will be used to power the "ground station." I set up the wiring so that I plug in the Deans to the BEC, and the Dragon Link transmitter and the OrangeRx receiver will always get clean, stable voltage from the dual output BEC. The 5000 mAh battery should be able to power this setup for hours more than I currently would ever need in a single session.
 |
| Battery for Repeater Setup |
 |
| Size Comparison |
New Wheels for the Sabre
The last time out with the Sabre I had an issue where I actually couldn't get it to take off in grass. The stock wheels are fairly small and they tended to dig into the grass instead of pushing it down and going over it. This prevented the plane from building enough speed for takeoff, even at full throttle.
The wheels tended to dig in on landings as well. This hasn't really been an issue ever since I upgraded the nose gear strut (as outlined here). However, it does cause the plane to decelerate excessively fast, and most of the weight during deceleration is transferred to the nose wheel. This causes an undesirable effect where the plane rocks right and left on the nose wheel and each main wheel until the plane comes to rest, rather than a controlled deceleration with nose gear steering to keep it straight. A good example of the this behavior is seen at the end in the Flight 42 onboard video.
In a simple effort to reduce this rocking effect, I upgraded the wheels. The Sabre came with 2.25" wheels all around, and now it has DuBro Super Lites all around, 2.75" for the mains, and 3" for the nose gear. I'm fairly certain this will prove to be an upgrade. I just hope the extra height added to the plane (and therefore CG above the ground) doesn't counter the advantage gained from the lower rolling resistance wheels.
The wheels tended to dig in on landings as well. This hasn't really been an issue ever since I upgraded the nose gear strut (as outlined here). However, it does cause the plane to decelerate excessively fast, and most of the weight during deceleration is transferred to the nose wheel. This causes an undesirable effect where the plane rocks right and left on the nose wheel and each main wheel until the plane comes to rest, rather than a controlled deceleration with nose gear steering to keep it straight. A good example of the this behavior is seen at the end in the Flight 42 onboard video.
In a simple effort to reduce this rocking effect, I upgraded the wheels. The Sabre came with 2.25" wheels all around, and now it has DuBro Super Lites all around, 2.75" for the mains, and 3" for the nose gear. I'm fairly certain this will prove to be an upgrade. I just hope the extra height added to the plane (and therefore CG above the ground) doesn't counter the advantage gained from the lower rolling resistance wheels.
 |
| Old vs. New Main Wheel (2.25" vs. 2.75") |
 |
| Old vs. New Nose Wheel (2.25" vs. 3") |
Subscribe to:
Posts (Atom)